Upload and Activate a Merchant Custom Skin
After the necessary files (theme.less and logo.png) have been designed locally, the merchant has to upload and activate them via the PXP Admin Tool. A preview functionality can be used to have an instant look on the layout.
The upload should be done on the PXP Test environment first (test instance of the PXP Admin Tool), and only if the skin has a designated design, the final version of the skin should be uploaded to the PXP Production system (live instance of the PXP Admin Tool).
Dynamic Skin Selection
PXP Financial offers merchants the possibility to upload skins dynamically which means there is no release on PXP Financial side necessary for integrating a new or updating an existing skin.
The main idea of using the Skin Upload is that anytime a merchant can customize all the details (as long as it is allowed by the validation rules) around the PXP Hosted Payment Page and the appearance of the Checkout page itself as well.
Once the skin is uploaded the merchant can preview it instantly, alternatively when the styles are verified the skin can be activated at a later date. The merchant has possibility to activate different skins for the different shops. The switching between skins is possible anytime.
Structure of an uploadable skin
This section describes the list of necessary files which must be uploaded to the SkinManagement interface in the PXP Admin Tool. Those files are the theme.less and logo.png and are used as a base for a merchant’s custom skins. The instant skin preview functionality gives an idea for merchant’s developer, how the implemented merchant’s skin will look like after activation.
In order to use an uploaded skin it has to pass an automated validation process which consists of certain validation rules described in this section. Please note that those rules may be changed by PXP due to various reasons.
The following file types can be uploaded via the SkinManagement interface in the PXP Admin Tool:
| File Type | File Name | File Extension |
|---|---|---|
| LESS file | theme |
|
| Image file | logo |
|
Maximum file sizes
The allowed file size for the Less file (theme.less) is 100KB and for the Image file (logo.png) is 500KB.
Must contain only allowed content
The Less file cannot contain any external links in order to pass validation successfully. This rule affects content files like images as well. The image file will pass the validation only if it has valid image content format.
Notes:
- The validation of the image files is done based on the byte content. This means for example that for a .png image which has by mistake a .jpg file extension the validation will fail!
- For verifying the theme.less file content PXP uses a Less Compiler. The theme.less file will pass the validation only if no error messages are thrown by the Less Compiler. All error messages are shown in the PXP Admin Tool when the merchant uploads a new skin or when the merchant modifies an existing skin.
Upload, Preview and Activation of a skin package in the PXP Admin Tool
This section explains how the PXP Admin Tool has to be used by a merchant to create (=upload and save), preview and activate a new skin (branded layout) for the PXP Hosted Payment Pages.
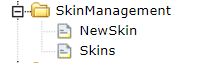
In the left navigation of the PXP Admin Tool, there is a section called “SkinManagement”. This section contains two subpages:
- NewSkin
- Skins
The below screenshot shows the left navigation of the PXP Financial Admin Tool:
Under NewSkin a new skin can be saved to the PXP Servers by uploading the necessary files. An instant Preview functionality is provided to check the layout immediately.
Under Skins the merchant can select and activate a skin for each shop of the merchant separately. The active skin will be used by the PXP Payment System and will be shown to the user on the Hosted Payment Pages.
Notes:
- The proper way of using the skin upload functionality should follow the process that a new skin is first uploaded and tested on the PXP Test environment. If the skin has a designated design then the final version of the skin should be uploaded to the production system.
If a skin does not appear properly, the regarding files can be changed (by uploading new ones) and saved to the existing skin. A deletion of existing skins is currently not supported.
Notes:
- Modification of an existing skin is only possible if this skin is currently not activated for a Merchants shop.
Uploading and saving a new skin
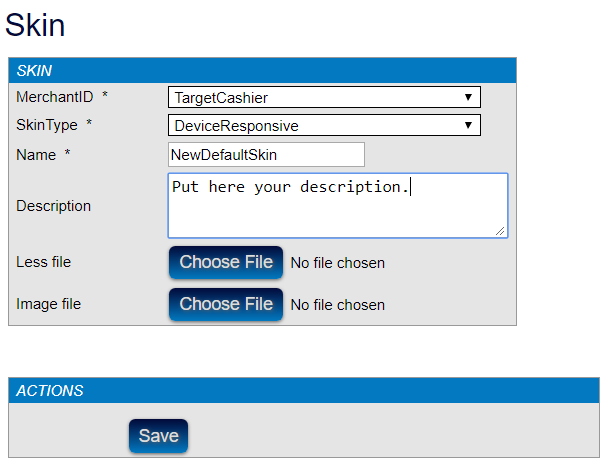
To upload and save a new skin to the PXP Payment Service SkinManagement - NewSkin can be used. The merchant has to specify a skin name, a description and selects the files on the local computer which should be uploaded.
Notes:
- A merchant can save more than one skin to the PXP Payment Service. But only one skin can be activated per shop.
The below screenshot shows the New Skin upload in the PXP Payment Service:
| Field | Mandatory | Description |
|---|---|---|
| MerchantID | Yes | The Merchant ID, prefilled depending on user login. |
| SkinType | Yes | The SkinType defines the type of checkout which is used/configured for the merchant. This will be prefilled and not changeable by the merchant. |
| Name | Yes | The unique name of the Skin for this Merchant. |
| Description | No | Optional field to describe the skin. Will be shown in the results list of the Skin overview page. |
| Less File | Yes | Use the Browse function to locate the prepared Less file for upload. Please note that the file name for the Less file must be: theme.less The less file is not allowed to contain any external links. The maximum file size is 100KB. |
| Image File | Yes | Use the Browse function to locate the prepared Image file for upload. Please note that the file name for the Image file must be: logo.png and file format must be a valid png-Format. The maximum file size is 500KB. |
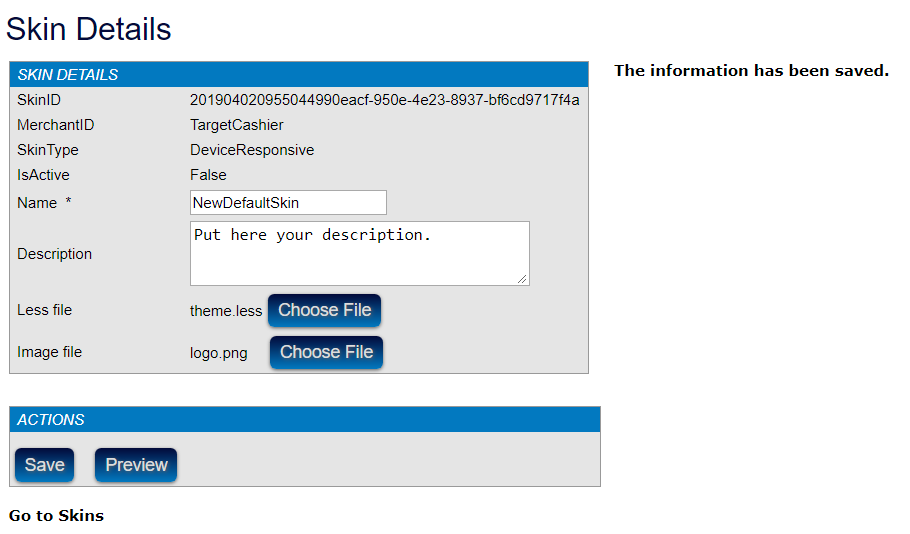
If the skin is valid then the new skin will be saved and the Skin Details page with the message “The information has been saved.” will be shown.
If the skin is not valid (which means at least one file is not valid), or the page was not filled out correctly the skin was not saved. The message “The skin was not saved.” will be shown. Additionally, the relevant error messages are displayed on top of the page.
| Error Message | Field | Details | Steps to Do |
|---|---|---|---|
| The file name of the Less file is not correct. The file has to be named 'theme.less’. | Less File | The file name of the less file has to be 'theme.less’. | Save your less file with the correct file name and upload it again (using the browse button). Then try to save the skin again. |
| The less file is not allowed to contain any external links. | Less File | Our validation does not allow external links in the less file. | Remove all external links from the file and upload it again (using the browse button). Then try to save the skin again. |
| The less file exceeds the allowed file size. The maximum file size is 100KB. | Less File | Reduce the file size, upload it again (using the browse button). Then try to save the skin again. | |
| The less file does not meet our format requirements. Please correct and upload it again. | Less File | To help you to correct your less file, the output of the validation process will be shown. | Please correct the less file and upload it again. Then try to save the skin again. |
| The file name of the Image file is not correct. The file has to be named 'logo.png’. | Image File | The file name of the Image file has to be 'logo.png’. | Save your less file with the correct file name and upload it again (using the browse button). Then try to save the skin again. |
| The image file exceeds the allowed file size. The maximum file size is 500KB. | Image File | Reduce the file size, upload it again (using the browse button). Then try to save the skin again. | |
| The image file is not a valid “.png”file. Please correct the content format and upload the file again. | Image File | The image file you uploaded does not meet the format criteria of a Pngformat. | Please choose a valid png-format for the Image file and upload it again. |
Notes:
- If an error occurs, the skin is NOT saved in PXP Payment Service and has to be re-uploaded after fixing.
The below screenshot contains an example outcome of the validation for an invalid skin. The result is split per file so that it is easier to see where and why the validation has failed.

Overview about uploaded Skins
To get a list of already uploaded skins, the "Skins" page can be used.

The below screenshot shows that only one skin was uploaded so far and the skin is not yet active.

Previewing and Modifying a Skin
This section describes the following functionalities of the PXP Admin Tool:
- Instant Skin Preview
- Skin Modification
The Skin Details page (see next screenshot) shows the details of an already saved skin – and allows its modification (change name, description and upload new files) and instant preview.
Notes:
- The Skin Details page and the Preview functionality do not support the file editing.
The user can view the Skin Details page in two ways:
- After a new skin was successfully saved to PXP Payment Service, the Skin Details page (see next screenshot) will automatically be shown.
- By clicking on the SkinID (=link) of a particular skin in the results list of the “Skins” page (see above screenshot).

The below table describes the fields on the Skin Details page:
| Field | Mandatory | Description |
|---|---|---|
| SkinID | Yes | System-ID of the Skin in PXP Payment System. This field cannot be changed. |
| MerchantID | Yes | The Merchant ID for which this skin was created. This field cannot be changed. |
| SkinType | Yes | The SkinType defines the type of checkout which this skin should be used for. This field cannot be changed. |
| IsActive | Yes | “True” – the skin is currently activated for at least one Shop of the Merchant. “False” – the skin is currently not activated for any Shop of the Merchant. This field cannot be changed in this page. To activate/deactivate a skin go to the “Skins” page. |
| Name | Yes | Name of the Skin. |
| Description | No | Optional field to describe the skin. |
| Less File | Yes | File name of the currently uploaded Less file for this skin. Use the Browse function to locate a new/different Less-File if you want to upload a new one for this existing skin. Please note that the file name for the Less file must be: theme.less The less file is not allowed to contain any external links. The maximum file size is 100KB. |
| Image File | Yes | File name of the currently uploaded Image file for this skin. Use the Browse function to locate a new/different Image-File if you want to upload a new one for this existing skin. Please note that the file name for the Image file must be: logo.png and file format must be a valid png-Format. The maximum file size is 500KB. |
The below table describes the actions which can be executed on the Skin Details page:
| Action | Description |
|---|---|
| Save | By clicking the “Save” button all changes made to the current skin are saved. |
| Preview | By clicking the “Preview” button an instant preview of the saved skin will be shown. Notes: If changes were made to the skin (new file was uploaded), the skin needs to be saved before the changes of the skin will be shown in the instant preview. |
Notes:
- A skin which was newly created/saved or changed is not active. In case the skin should be activated, the “Go to Skins” link at the bottom of the Skin Details page can be used to go to the “Skins”-page where the skin can be activated for the Merchants shop(s).
Please note that an active Skin (=the skin is currently activated for at least one Shop of the Merchant) cannot be modified. The below screenshot shows an example of the Skin Details page of an active skin (IsActive=”True”). The “Save” button is disabled as no changes can be made/saved.

Activating a Skin
After a skin has been saved successfully, it can be activated for a Merchant’s shop.
When the skin is active, this means it is shown to the Merchants users/customers when they are redirected to the PXP Checkout page of the regarding Shop.
For each Shop of the Merchant, the respective skin has to be selected and activated separately. So it is possible that each Shop of the Merchant can have its individual skin.
To activate a skin for a Shop, the page SkinManagement - Skins has to be used. The Merchant first has to select a Shop in the “ShopID” drop down and click “View”. The list of available skins for the Merchant will be shown. In case there is already an active skin for the selected Shop, the checked radio button in the “IsActive” column will indicate this.

To activate a new skin for the selected shop, the skin which should be activated has to be found in the results list and the radio button in the “IsActive” column has to be checked. To confirm and submit the change, the “Update” button has to be clicked.

Filters/Drop Down Fields:
| Field | Mandatory | Description |
|---|---|---|
| MerchantID | Yes | The Merchant ID, prefilled depending on user login. |
| ShopID | Yes | The Shop of the Merchant for which the active/not active skins should be shown or for which a skin shall be activated/deactivated. |
| SkinType | Yes | The SkinType defines the type of checkout which is used/configured for the merchant. This will be prefilled and not changeable by the merchant. |
Results (List of skins):
| Field | Mandatory | Description |
|---|---|---|
| SkinID | Yes | System-ID of the Skin in PXP Payment System. By clicking on this link, the Skin Details page will be shown. |
| Name | Yes | The unique name of the Skin for this Merchant. |
| Description | No | Description of the skin, which was entered by the Merchant during skin upload. |
| IsActive | No | This radio button will be unchecked in case the skin is not active for the selected Shop. It will be checked in case the skin is activated for the Shop. To activate a skin for the selected shop, the skin which should be activated has to be found in the results list and the radio button in the “IsActive” column has to be checked. To confirm and submit the change, the “Update” button has to be clicked. Notes: Only one skin can be active for a Shop. |
Notes: Due to caching it can take several minutes until the newly activated skin is finally shown to the user on the PXP Checkout pages.