Apple Pay Deposit - PXP Checkout
ApplePay is a secure, easy way to make payments for physical goods and services within iOS and watchOS. Websites can also accept ApplePay – it is available in Safari for iPhone, iPad, and Mac. Users authorize payments and provide shipping and contact information, using securely stored credentials on an iPhone, an iPad, or a MacBook Pro with Touch ID. On other Macs, the purchase is confirmed with the user's nearby iPhone or Apple Watch that has ApplePay enabled.
The following method ID is covered in this section:
| ID | Name | Credit/Debit State |
|---|---|---|
| 292 | AppleCardDeposit | N/A |
Payment method interaction type: Synchronous Execution (see Interaction Types)
Redirect Integration
Applepay deposit is now available in the checkout.
RequirementsMerchants should provide to it´s PXP contact one (or many) device identifiers (UUID) for testing. These are from devices, MacOS device or an iPhone, the merchant will use for testing. These should not be a production device.
Merchants should also provide an eMail address that is not yet associated to an Apple account. The PXP team will then setup both in the Apple sandbox account.
The PXP team will provide a text file that needs to be place on the merchant webserver, e.g. on the development environment at
https://dev.example.com/.well-known/apply-developer-merchantid-domain-association.txt The file will be provided by PXP, once uploaded by the merchant, it has to be validated by PXP.
In order to initiate a PXP Checkout payment with ApplePay, please pass the following _additionalDetails _fields:
| key (value type, account type, required) | Description |
|---|---|
| DomainName (string, optional) | This parameter will be configured by PXP in the background. Optionally it can be passed by the merchant. |
| Description (string, optional) | Please enter any description. |
The following getRedirectData request will open directly the Applepay iFrame:
<getRedirectDataRequest xmlns="http://www.cqrpayments.com/PaymentProcessing" xmlns:xsi="http://www.w3.org/2001/XMLSchema-instance" xmlns:xsd="http://www.w3.org/2001/XMLSchema">
    <merchantID>MerchantID</merchantID>
    <redirectParameters xsi:type="paymentMethodDetailsRedirectParameters">
        <shopID>ShopID</shopID>
        <httpMethod>GET</httpMethod>
        <returnUrl>https:/return.url</returnUrl>
        <languageCode>en</languageCode>
        <currencyCode>eur</currencyCode>
        <countryCode>GB</countryCode>
        <additionalDetails>
            <detail xsi:type="keyStringValuePair">
                <key>DomainName</key>
                <value>payments.test.kalixa.com</value>
            </detail>
            <detail xsi:type="keyStringValuePair">
                <key>Description</key>
                <value>PaymentDescription</value>
            </detail>
        </additionalDetails>
        <user>
            <id>f7ce6dca-24e9-4e0f-a003-a20073</id>
        </user>
        <merchantTransactionID>Apple-Merchant-006</merchantTransactionID>
        <grossAmount>10.00</grossAmount>
        <expirationTimeSpanInSeconds>3600</expirationTimeSpanInSeconds>
        <successUrl>https://google.com/successUrl/</successUrl>
        <pendingUrl>https://google.com/pendingUrl</pendingUrl>
        <errorUrl>https://google.com/errorUrl</errorUrl>
        <cancelUrl>https://google.com/cancelUrl</cancelUrl>
        <refusedUrl>https://google.com/refusedUrl</refusedUrl>
        <paymentMethodID>292</paymentMethodID>
        <isPaymentMethodChangeAllowed>true</isPaymentMethodChangeAllowed>
    </redirectParameters>
</getRedirectDataRequest>
Allowed card types and supported networks
The following merchant option settings will be configured by PXP on request from the merchant.
PXP can configure allowed types, either supportsCredit - only credit cards are allowed - or supportsDebit - only debit cards are allowed.
PXP can configure various supported card networks, such as Visa, Mastercard, Discover or Amex, however also depending on the processor of the actual card transaction.
Handling events from ApplePay in the merchants page
The checkout page that contains the ApplePay button sends events that can be used in the hosting page to determine if ApplePay is available for the customer, and about the status of the payment process.
By handling these events, the merchant has full control about the user experience.
If a merchant decides to handle the events, the automatic redirection to success or error page can be configured with the following options:
- when the payment is finished, redirection in the iFrame to the success or error page sent by the merchant.
- when the payment is finished, redirection will be done on the hosting page of the iFrame
- when the payment is finished, no redirection will take place.
The following events are supported:
- When the ApplePay image is displayed, the event will be:
{"eventType":"applepayAvailable", "applepayEnabled":true,"paymentId":"example-151","paymentSuccessful":null,"message":null} - When the ApplePay payment has failed (with processor), the event will be:
{"eventType": "paymentProcessing", "paymentId":"example-151","paymentSuccessful":false} - When the Applepay payment is successful, the event will be:
{"eventType": "paymentProcessing", "paymentId":"example-152","paymentSuccessful":true} - When the ApplePay payment has timed out:
{"eventType":"timeout","applepayEnabled":false,"paymentId":"example-173","paymentSuccessful":false,"message":"The session timed out"} - When the configuration is incorrect (domain name is wrong (if sent)), the following event will be returned:
{"eventType": "paymentProcessing", "paymentId":"example-152","paymentSuccessful":false, "message": "ApplePaySession canceled."} - When the ApplePay control appears and the user clicks on the "Cancel" button on the top right:
{"eventType": "paymentProcessing", "paymentId":"example-152","paymentSuccessful":false, "message": "ApplePaySession canceled."} - When the Applepay page is opened in Chrome, a message "ApplePay is not available" is displayed. No event is returned.
Here is an example how to handle ApplePay events:
<script>
	function handleApplepayEvents(event) {
		if(event.origin == 'https://payments.test.kalixa.com' || event.origin == 'https://payments.pxpfinancial.com'){
			if(event.data.eventType == 'applepayAvailable'){
				if (event.data.applepayEnabled){
					// The ApplePay button is shown
				}
				else{
					// ApplePay can not be used in this browser/device
				}
			}
			else if(event.data.eventType == 'paymentProcessing'){
				if (event.data.paymentSuccessful){
					// The payment was processed successfuly
				}
				else{
					// There was an error in the payment processing
					// event.data.message contains an error message
				}
			}
		}
	}

	window.addEventListener("message", handleApplepayEvents, false);
</script>
Testing Guide
Add a test card to the Wallet
- Make sure to sign out of iCloud and sign into your test device with your sandbox tester account.
- Go to Wallet ("Wallet & ApplePay") and tap Add Credit or Debit Card. (Click on "Add card ..", then on "Add a Different Card", then "Add card", then enter a card number, expiry data, CVV number, then click on "Agree" and wait then "Next".
- After your card has been added, you may begin testing.
- When the ApplePay control is displayed, you confirm the payment by touchID or faceID or by password.
Test cardsFor test cards, go to https://developer.apple.com/apple-pay/sandbox-testing/
Scroll down to the section "Test cards for Apps and the web"Only consider the test cards listed on this page.
The merchant does not need to configure a Apple developer account for Applepay. The merchant does not need to register a merchantID, create certificates and verify it´s website domain. The merchant does not need to create a sandbox test account.
Merchants using PXP´s checkout don´t need to do that.
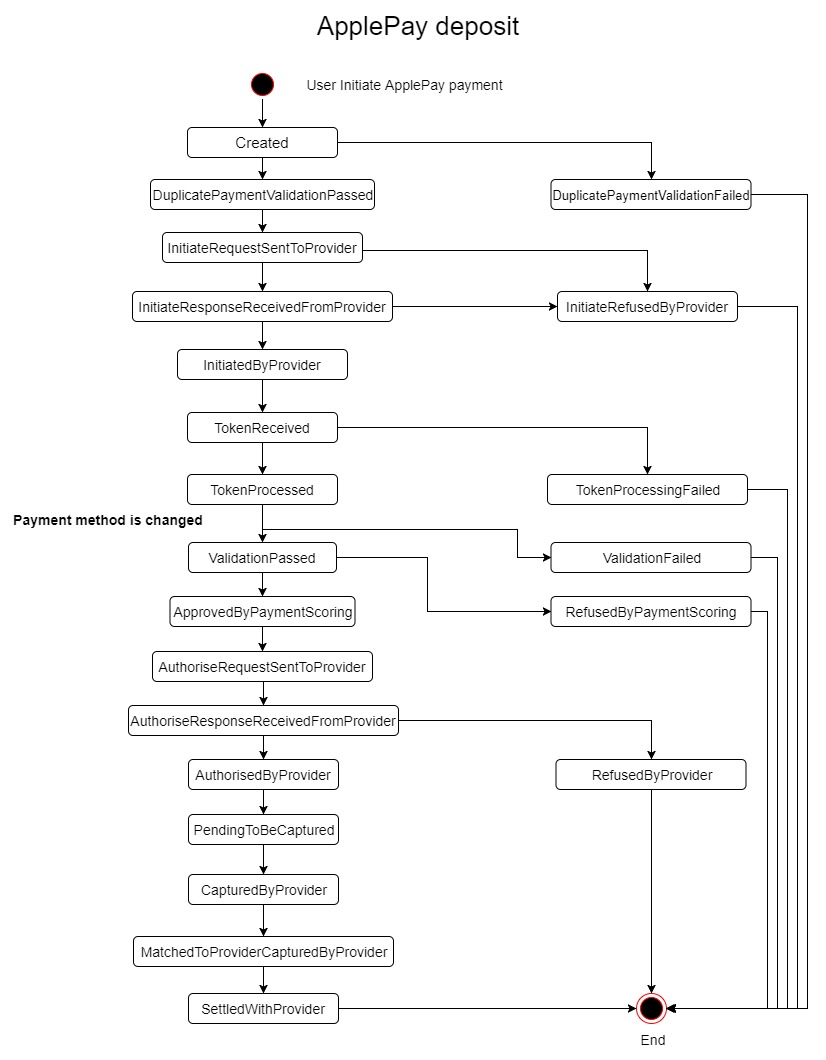
State Diagram
The payment will be initiated with payment method being ApplePayDeposit and will then be changed to e.g. payment method AppleVisaDeposit once the token has been processed.

Notifications
No notification are sent as long the payment is with payment method ApplePay Deposit. After changing the payment method the notifications are sent according the card payment methods' integration manual. (see Card Payments Notifications)
Updated 8 months ago
